Menu

Thursday, 2 February 2017

PopAds Lesson 2

BUDGETS

First you need to enter the maximal price you are willing to pay for a single popunder. If you enter low bid, you will not get the greatest results for your campaign. Your ad will probably display on slower traffic with lower quality.
Daily budget is the limit you will set for daily costs or your campaign. If you leave this field empty, you will have no limits for your daily budget.
Total budget can be topped-up later. In order to have any budget, you need to top it up.

THROTTLING

Throttling can be Disabled, set Manually or Automatically.
When reducing the traffic speed manually by percentage, you will slow down your campaign speed. It is not recommended to use this option for new campaigns.
With Automatic Throttling, you can set the maximum number of impressions (traffic speed):
Or you maximum amount of spending per time unit:

CATEGORIES


There is wide range of available choices. You can add all or choose from Categories such as Adult content, Sport, Health, Internet, Money, Science, Shopping…
By clicking on button Add, what you chose in available choices will show up in Your choices.

COUNTRY TARGETING

On the right side, you will have a list of all available countries
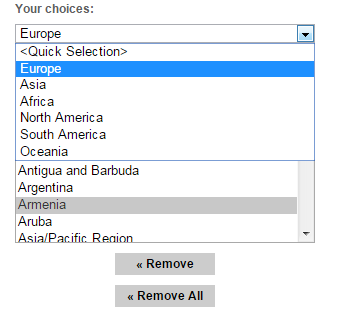
If you click on Europe, all the European countries will be highlighted which will make your country selection easier.


Wednesday, 1 February 2017

PopAds Lesson 1

             How to Setup a Campaign on Popads


Popads is a paying advertising network with tons of traffic for both desktop and mobile, in many GEO locations. It is specialized in pop-unders.
When creating a campaign, under Advertising type you will have options: pop-under, pop-up, tab-under  (only works with Chrome browser) and tab-up .
Pop – unders are pop-up ads that open in new window of your browser, usually behind the main window and are visible when user closes or minimizes the main window.
When you register with Popads and your email gets activated, you can log in to Advertiser’s Panel. Here you will have numerous options.
Let’s start by creating our first campaign!

STEP 1 – NEW CAMPAIGN

On the left-side of your panel, click on button New Campaign:

General Information
First step is to choose a name for your campaign. In our example, we will use “Slim and Fit”.
You can choose to enter your landing page URL and to use only one URL, or you can use multiple URLs.
Example of Single URL:
Example of using Multiple URLs:
Do not forget to include “http://” when entering your URLs.

Quality
This is the quality of the website which will display your advertisement.
Frequency Cap
Here you will choose how often your landing page will be displayed to one user. You can choose between Raw Traffic, 1 view/1 hour, 1 view/2 hours… and last option is 1 view/31 days.
After Approval
Select if the campaign will start immediately after it has been validated, or Pause it and you can run it manually later.
Prime Spot
When visitor hasn’t received a pop-under in the last hour, this is when Prime Spot bidding will occur.  You can choose to include All traffic, PrimeSpot Only and Non-PrimeSpot Only.
You can also specify that your landing page contains adult content.
In the beginning of this tutorial, we already mentioned types of Advertising:
You can enable or disable option to allow other advertising methods when the one you chose is not available.

What is PopAds

What is PopAds


PopAds is a performance network specialized in Pop Unders. They have good rates and they can monetize all countries. Something great about PopAds is that they can pay daily as long as you earn $5 or more per day. Their quality is good, and they also have pop ups, tab ups/unders and other monetization methods. Their approvals are easy and setting your ads takes just a few minutes.
Click here for SingUp

Ms Excel Lesson 1

Getting Started with Excel

This chapter teaches you how to start an excel 2010 application in simple steps. Assuming you have Microsoft Office 2010 installed in your PC, start the excel application following the below mentioned steps in your PC.
Step 1 − Click on the Start button.
Step 2 − Click on All Programs option from the menu.

Step 3 − Search for Microsoft Office from the sub menu and click it.
Step 4 − Search for Microsoft Excel 2010 from the submenu and click it.
This will launch the Microsoft Excel 2010 application and you will see the following excel window.


Ms Excel introduction Lesson 1

Excel Introduction

Microsoft Excel is a commercial spreadsheet application, written and distributed by Microsoft for Microsoft Windows and Mac OS X. At the time of writing this tutorial the Microsoft excel version was 2010 for Microsoft Windows and 2011 for Mac OS X.
Microsoft Excel is a spreadsheet tool capable of performing calculations, analyzing data and integrating information from different programs.
By default, documents saved in Excel 2010 are saved with the .xlsx extension whereas the file extension of the prior Excel versions are .xls.

Audience

This tutorial has been designed for computer users who would like to learn Microsoft Excel in easy and simple steps. It will be highly useful for those learners who do not have prior exposure to Microsoft applications.

Prerequisites

Before proceeding with this tutorial, you should have a basic understanding of Computer peripherals like mouse, keyboard, monitor, screen etc. and their basic operations. You should also have the basic skills of file management and folder navigations.